Monday, June 20, 2011

June 19 2011 - Morris County Kansas Supercell

This started out as a fixing the truck and had to drive to Emporia to get parts day. I noticed the towers trying to go up a long ways WNW of Emporia and decided I wanted to do a blind chase day rather than get back to the truck repairs.

I kept seeing the towers get blown off and was getting to the point of "why bother" when I noticed that they were rebuilding. Still many miles out I noticed that the cell had a foot even if little precipitation yet. That was enough to keep me going NW, a bit later the foot fell apart and recycled and then I noticed that even the upper clouds seemed to hint of rotation.

June 19 2011 - Morris County Supercell from Northern Chase County

Numerous miles later I managed to get caught up with it still West of Herington for some awesome structure shots. The rotation was amazing.

June 19 2011 - Morris County Supercell

June 19 2011 - Morris County Supercell

June 19 2011 - Morris County Supercell

June 19 2011 - Morris County Supercell

Me being the structure fan I was heading out for better structure when it first produced so I had just left the action area and missed the better position for shots of the funnel. Supposedly this was the tornado but a hill would have kept me from seeing any ground rotation and though the condensation funnel did reach much farther than this shot though very thinly I didn't see contact so funnel it is.

June 19 2011 - Morris County Supercell Funnel

Continuing on for structure and the sunset.

June 19 2011 - Morris County Supercell Sunset

The structure remained amazing with it spinning like a top even through its eventual death in Geary County.

June 19 2011 - Morris County Supercell After Sunset

June 19 2011 - Morris County Supercell - Underneath a Dying Beauty

June 19 2011 - Morris County Supercell - Death is Not Far

June 19 2011 - Morris County Supercell - The Battle is Lost

More photos of the progression of this beast on my Flickr

You can buy prints of these photos at Kansas Horizons

Friday, September 17, 2010

September 15 2010 - Tornado Warned Storm Near Severy Kansas

 I had watched the storm form and the great radar presentation it had but nearly waited to long to head out for an intercept. After I got about 15 minutes out I realized I had left my cameras tripod mount on the desk so I was already off to a bad start. I got slowed down by some road construction South of Yates Center that put me back 15 minutes or so and ended up near Fall River on 400 when I heard that there was a verified tornado on the ground near Severy.

 I could see a section of intense lighting under the base of the storm that was highly suspect as I topped a few hills but I could see nothing definite. I stopped about 7 miles East of Severy to shoot the structure because I knew there was some history of monster hail in a few of the storms and that the tornado was supposed to be along HWY 400 so I decided not to punch through. Being the structure fan I am I started shooting in the path of the oncoming tornado with my Pentax K-7 and my Sigma 10-20mm Superwide Lens which gives great structure pictures but puts you much closer to the action than it appears in a photo. I wasn't let down even though it was pretty dark already....

September 15 2010 - Tornado Warned Storm near Severy Kansas

 Again, in this case I already know am in the path of a reported oncoming tornado, this is not the place to be! These photos while in my opinion show the beauty of the oncoming storm are a perfect example of why it is often what you do not see that makes them quite dangerous. I never seen this until after reviewing the photos but a lightning strike in just the right place in the clouds revealed a rain wrapped tornado moving right at me. This is a perfect example of why a rain wrapped tornado is so very dangerous.

September 15 2010 - Tornado Warned Storm near Severy Kansas, 10mm Super Wide Angle, Tornado included.

 The next hazard was of course my second favorite part of a storm, Lighting. The lighting was quite intense here. This is a photo shot a few seconds behind the one that revealed the rain wrapped tornado in which it is again not even visible to the camera.

September 15 2010 - Tornado Warned Storm near Severy Kansas

 The lighting show goes on as it gets closer.

September 15 2010 - Tornado Warned Storm near Severy Kansas

 And after many close calls, too close for comfort. Again this is at Super Wide Angle.

September 15 2010 - Tornado Warned Storm near Severy Kansas. 10 MM Super Wide Angle close lighting strike.

 I moved back to near Fall River as the tornado sirens started sounding there to catch some more lightning and then back to Fredonia where we got run over by high winds and torrential rain. Again, these and many other photos are for sale and can be found on my website at KansasHorizons.com

Thursday, September 2, 2010

August Double Rainbows in Kansas

I love capturing atmospheric optics which include things like rainbows, halos and sundogs.

The morning of August 31st provided me with a small narrow line of showers perfect for morning rainbows. I headed out with my Pentax K-7 and my Sigma 10-20mm super wide angle lens and got on the East side of the line of showers. In order to get the best full rainbows you need the sun to be hitting the cloud full on while still low in the sky. This typically means when the showers are first popping up or you will end up with to much cloud cover to get any full shots.

The rainbow this morning went from a single to a double in short order and was persistent for quite a long time giving me a nice collection of Kansas Double Rainbow photos.

August 31 2010 - Double Kansas Rainbow under the morning rains.

I tried out various foreground scenes in a hurry while trying to stay in front of the rains but remain close enough to keep the rainbow right close and vivid.

August 31 2010 - Double Kansas Rainbow under the morning rains.

It turns out that you can actually toss quite a few things in the foreground when the rainbow lasts this long which is rare. usually the clouds block the sun partially or in full and it's a done deal.

August 31 2010 - Double Kansas Rainbow Over Wild Sunflowers

If you have tried catching a full rainbow then you probably realized that it rarely fits fully in the picture and especially a double rainbow. Along comes the superwide lens. My choice was the Sigma 10-20mm which was the most affordable lens for my budget that would still do a good job.

August 31 2010 - Double Kansas Rainbow under the morning rains.

If you have captured one this close you also realized that your camera is likely going to get wet. Generally that will spell doom for a digital camera but since my usual photographic outings involve storms and rain I opted for the Pentax K-7 with its weather sealing. Now you can get weather resistant lenses but in this case the Sigma 10-20mm is not and so you do run an increased risk of problems but I do feel better that the camera is still sealed.

Remember that my photos are available for purchase for prints or digitally for commercial and hobby use on KansasHorizons.com.

Thursday, August 19, 2010

Video Time Compression with VirtualDub

If you are like me you have probably wanted to do some video time compression of some video in the past but have never been able to justify the cost of the fancier programs that were set up to do. I have found the answer for both of us and it is free.

I had used Virtualdub in the past but could never figure out quite how to do it correctly until tonight. I took a simple HD video that was laying around that I had shot back in July with my Pentax K-7 hoping to get some good lightning strikes and tossed it in Virtualdub and got some pretty good results. The video was originally 3:14 long and was cut to :24.


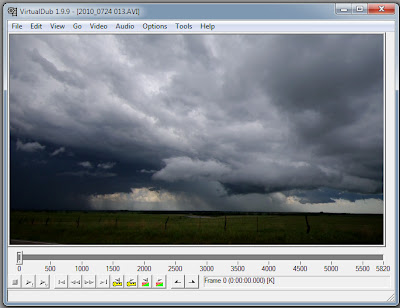
Grab you a copy of Virtualdub if you don't have it and lets get started. Open up Virtualdub and drag your file into the window and drop it in and you should see something like this:


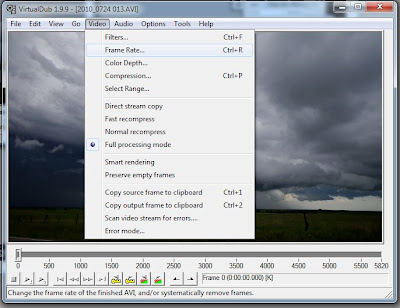
Then click on video in the menu and select "Frame Rate" like so:


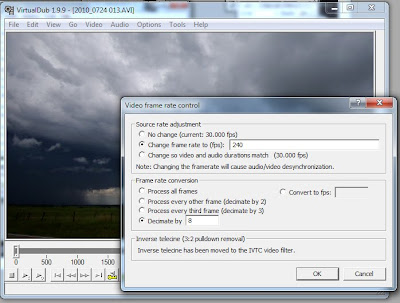
Now here is the part you will have to consider but myself I went with an 8 to 1 ratio. If you want to speed up your video then multiply your frame rate by the rate of speed you want to compress it by (30 times your desired ratio) and enter it in the "change frame rate to (fps)" box and then enter the same multiplication factor in the "decimate by" box. Make sure you clicked the correct selections as shown below and click OK.

Some people will do a 4X rate and in that case you would have a "120" frame rate and a decimation factor of "4". In my case I wanted an 8x speed and so I ran a "240" frame rate and a decimation factor of "8" as shown in the next screen:


At this point you can go ahead and save the AVI file but it will be huge and need compressed. With the right codecs installed you can also do that under the video option as well by clicking
the appropriate codecs before saving the file.

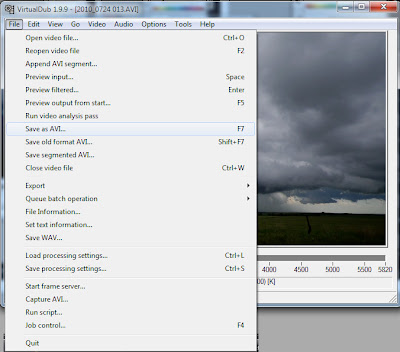
Click File / Save as AVI and let it run out your new time compressed video.


It is that easy. Just remember that if you don't use some kind of compression codecs in Virtualdub that the file will be huge and will need to be compressed with another program after the fact.

Jim Saueressig - KansasHorizons.com

Wednesday, March 18, 2009

How to Take Photos of Lightning with a Digital Camera

One of the questions that I am often asked is "How do you get such great lightning photos?" The next question is usually "How can I get shots like that? I have tried but I keep missing the strikes because I am not fast enough."

Well the answer to that is a lot of luck but it is not quite as much about luck as it is technique though you can help increase the odds of getting a strike by making sure you have what it takes to get the job done. First of all this is a digital camera guide. Film is basically the same but has more limitations in getting that great lightning shot.

#1 - Your camera will need to have the ability to be focused manually.
#2 - Your camera will need to have the ability to hold the shutter open for a length of time.
#3 - You will need a steady tripod.
#4 - You should have a cable release. (required for bulb mode)
#5 - The ability to turn off your cameras noise reduction. (Not mandatory but recommended)

The reason for the manual focusing camera is that it will be dark and you will need to be focused out at the point of the storm. An auto focus only camera will not be able to do this in the dark. You will be holding the shutter open for extended periods of time is the reason for a camera with a shutter setting or preferably a bulb setting.

First of all the most important item is common sense. Lightning can kill you, a lightning photo is not worth your life. Remember that lightning can reach out over 15 miles from a storm and take you out. I can tell you how to get the shots of lightning but cannot keep you alive, that is up to you. One of the branches from the photo on the left landed 6 feet from my head on a weather instrument pack on a small shed where I was shooting. The main branch landed in the middle of a housing area near the lake.

First of all to capture the lightning you will need a storm. Once you have that the best time to get lightning shots is on the approach of the storm and especially if you can get situated just outside of its path. Most lightning shots are taken after dark, this is the easiest way to get lightning photos so we will be covering that first. Get in a good spot that you can get out of once it starts raining. The better spots will be out in the country where there is little or no light pollution and distant lights in your field of view. You can have light in your field of view but the more of them there are and the closer they are the less time you can keep your shutter open.

When you found the spot you want to shoot from you should consider different features like distant hills or tree lines etc that will enhance your picture but keep in mind that having a flat horizon in front of you will be the best for capturing ground hits and such in the distance. Foreground objects are nice if you are mainly getting cloud to cloud lightning like in the photo to the left. Set up your tripod in a steady manner as wind will usually be blowing with the approach of a storm and it will be harder to keep it steady, if you have no lights in your field of view this is not so critical as the lightning will be the only light source that might show motion over time.

Once you have the tripod set up and the camera mounted you are almost ready to go. Its as easy as holding the shutter open and waiting for a strike.... Well mostly, you will still have to learn some of the important things over time to help get more consistent shots but here are some starting points. First of all I shoot at ISO:100. If something is real distant you may want to increase this some but remember noise is your enemy and time lapsed shots are where that increases fast. Make sure your noise reduction is turned off on your camera or you will be waiting half of your shooting time for the picture to process.

You will find that one of the biggest problems will be shots that were too bright for your settings and therefore blown out and there is no way to recover those shots. I would suggest a setting of f:3 to f:5 ish for the distant stuff and f:5 to f:8 ish for stuff getting closer. Rain around the strike can make it brighter as seen in the photo to the left. I have had shots blown out at f:19ish but those strikes are a block or two away or closer and at that point you have been flirting with death for a while and I do not recommend it. I have had strikes within a 20 foot area of me on a few occasions and can tell you that I have been more than lucky at that point. God needed me here for something else is all I can figure. You may not be so lucky.

Once you have your camera settings as you want them you will need to verify your focus is at infinity (don't forget many lenses can go past infinity so if you can find a distant light to verify your focus that is a good thing to check). Get your camera aimed at the storm and make sure the the horizon is level. If you are using a camera with a shutter setting set it at 30 seconds (if it is dark enough or adjust to less as needed) and fire away. The preferred method here is a cable release cord and a bulb setting and if dark enough go a minute or maybe 90 seconds at a time. Your camera will limit you here depending on it's noise levels.

Here is the point you have a decision to make, are you going for single strikes or multiples?

The shot to the left was actually a single strike that was multi branched but the same effect is possible by leaving the shutter open longer.

I personally like single strikes and therefore release the cable after a strike and usually check it in the viewer for correct exposure and adjust as needed and fire of the next shot. If you are shooting for multiple strikes you can keep the shutter open for longer but you need to consider a second or third strike has the chance of blowing out previous shots. Remember to keep your time down so that you manage noise and light pollution.

Now daytime shots provide a completely different problem because you cannot use a bulb setting and the maximum time you might be able to keep the shutter open will be a second if you are lucky and that will usually be in the late evening or a very dark storm scenario. In this case you would need to start shooting away and hope you have some good luck. A storm with intense and frequent lightning would certainly help however. A camera with continuous and fast shooting and a locked cable release is the ticket to shooting in these conditions. You will definitely rack up some shutter wear and tear with such a method but if you are real lucky you can get an excellent colorful daytime shot.

This little guide should help you get started in lightning photography. Your options for using lightning in various shots is pretty much limited to your own imagination. Myself I am still trying to perfect a sunrise or sunset lightning combination shot. I have had a few close encounters like the lightning at sunrise to the left but nothing to make me consider it accomplished yet. I also try to combine it with other things when ever possible.


This photo I had taken in the past was not a great photo for quality but had many different elements combined in one photo. You can see the remaining colors of the sunset over the lake in the lower right corner while lightning was striking in the left bottom corner with a very bright half moon lighting the sky and the top of the distant cell while having many stars visible over the entire scene.

There are still many scenes I want to accomplish with my lightning shots which range from tower and building strikes to a distant storm under a meteor shower etc. These scenes will be a little harder to catch in some cases and some will be near impossible in others but not completely impossible so I will keep trying. Just remember to be safe, lightning and other storm photography can be a rewarding hobby but it can be very dangerous as well. Play it safe to shoot another day.

Many of my photos are available for viewing and are also for sale on my website at KansasHorizons.com and others are available for viewing on my flickr.com/photos/kansashorizons site.